11-6-2014 - Inspired by... Vanellope
I saw the Disney movie Wreck-It Ralph (if you haven't seen it yet, it's a really fun movie for boys and girls, young and old) I think shortly after it became available at the local movie rental place. I loved it! Even my brothers and parents really liked it. It took a few months before I started plotting how I'd make a Vanellope (one of the main characters) outfit for my dolls. And in case you have seen the movie, no, I am not going to attempt making Vanellope's Princess dress (I'm not saying I never will, I'm just saying it is highly unlikely I ever will). It's just.... too much (for me, anyway). Anyhow - the Glitch outfit. The outfit she wears through like 90% or more of the movie. That's the one I like so much. For those who have not seen it, or even if you haven't seen it in a while, you don't have to run off and go looking for Vanellope. Here's what I used as a guide:
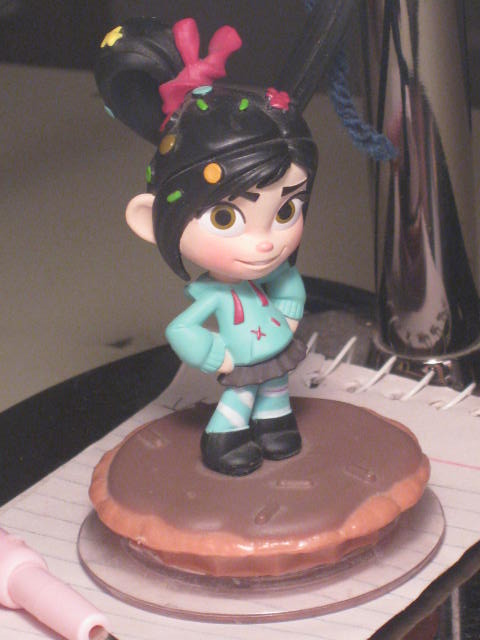
The Disney Infinity Vanellope figure
I did refer to movie screen shots a couple/few times, as the figure doesn'the have all the details I wanted to include.
Step 1: The Reese's Cup wrapper skirt
I don't have many skirt patterns, and none like the double layer Reese's Cup style. I knew where I could buy one, but... you know.. money's hard to come by without a job... Anyway, I figured it wouldn't be too hard to work it out myself. Sooo... I jumped in head first. I slipped my model, Abby, down one of the legs, so I knew where I needed to cut it off at. After marking the fabric, I removed Abby and cut the fabric at the mark. Then I sewed the casing, hemed the bottom, and then slipped elastic through the casing. At this point, please let me point out that I have never made a double layer skirt before, I was tired, and clearly not thinking things through. Had I been reasoning properly, I would have done things much different. In any case, back to the narration. I measured out how long the second layer needed to be, including sewing allowance, and marked and cut. Then I stared at it and tried to figure out how to attach it to layer 1. Again, please remember I was tired... I ended up making layer 2 as a skirt, then sewing it to layer 1. I know, I know... now, anyway.. not the most efficient method here... But, it worked, sort of.. the waist line is a little bulkier than it needs to be, but I'must not complaining. If it ever bugsince me to badly, I can always redo it.
Step 2 - Leggings
Step 2 - Leggings
For the hoodie, I used KottenCandyPattern's Kozy Kotton Sweat Set pattern. I don't remember how I found it, but I am so glad I did. I'd never heard of them before, but this pattern is great! It is really easy to use, even if you've never made a Hoodie before (as was my case). I didn't get a picture first, but I took apart a hoodie that I used to wear, and that's my fabric for this dolly hoodie. Which is great, because it had ribbing on it that I was able to reuse. Not so great, because I used that hoodie to play outside in when I was younger, ando there are some stains on it now. Anyway, I traced, cut, and sewed up the pieces (I have been using Pilot Frixion pens, the ink from which erase with heat, which is what the red marks are) fairly quickly. The instructions were really easy to understand and follow. The only time I deviated was when I didn't completely sew the hood on all the way. I wasn't sure how to make the openings for the drawstrings, so that was my solution. And yes, the pocket on the front of the hood is a real working pocket. After I was done with this, I picked it up for the night. Well, morning, really... yes, it really was after 4am. I tend to get pretty focused once I start sewing.
Step 4 - Candy!
Step 4 - Candy!
The next day, I pulled out some beads that I thought would work, and got started on making the hair pieces. I measused out a length of thread, tied a bead of each end, and then did another, until I had all I wanted. I had previously purchased some fake candies from delishbeads on etsy, and those I attached with some magnets. I stuck a small piece of magnet on the back of each candy, and then I tucked an equal amount of magnets in her hair.
All done!!
Doll: #48
Shoes: JLY boots
Doll: #48
Shoes: JLY boots
